4. Startup & Operation #
WARNING! Check and verify the tightness of all power distribution lines (screw terminals) before the startup process.
NOTE – Ensure all steps and precautions in Section 3 have been completed before starting up the wheelblastIT
4.1 Turning On Power Supply #
- Turn on control 120VAC circuit for the electrical enclosure.
- Turn on the 3PH power circuit for the VFDs.
- Turn on wheelblastIT power via the rotary switch on the front of the electrical enclosure.
4.2 Conveyor Set Up #
- From the Main screen, press the Settings button (Fig. 4.2 – 1).
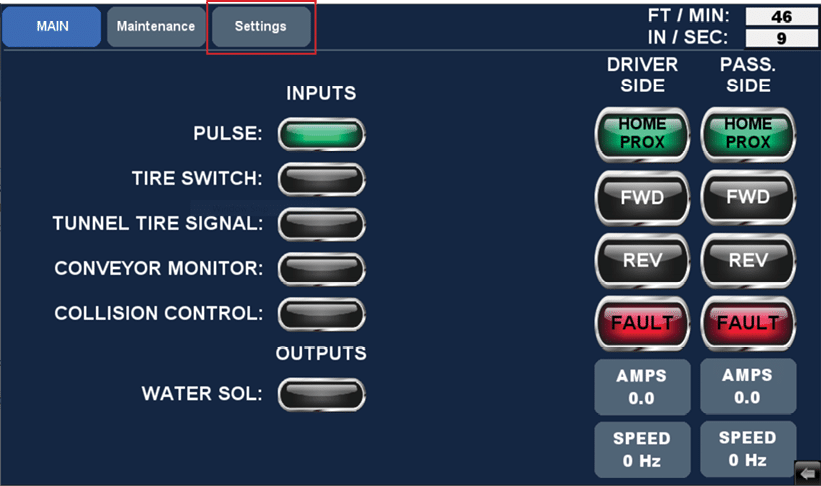
Fig 4.2 – 1 – HMI Main screen
- Enter the information for your specific conveyor set up.
- This information should be obtained from your tunnel controller. This must be correct to ensure proper system performance. The definition of each setting is listed below:
-
Conveyor Inches Per Revolution: How far the chain travels per revolution of the drive sprocket.
-
Pulses Per Revolution: Number of pulses the system receives per revolution of the drive sprocket. It is recommended this setting remain at 1.
-
Slower Speed Modification: Desired percentage to specify how much slower the trolley should run compared to the conveyor. This is most commonly used for belt conveyors where the vehicle’s wheel is not rotating to ensure the spray pattern runs through the wheel.
-
Travel Distance: Total travel distance of the trolley.
-
- This information should be obtained from your tunnel controller. This must be correct to ensure proper system performance. The definition of each setting is listed below:
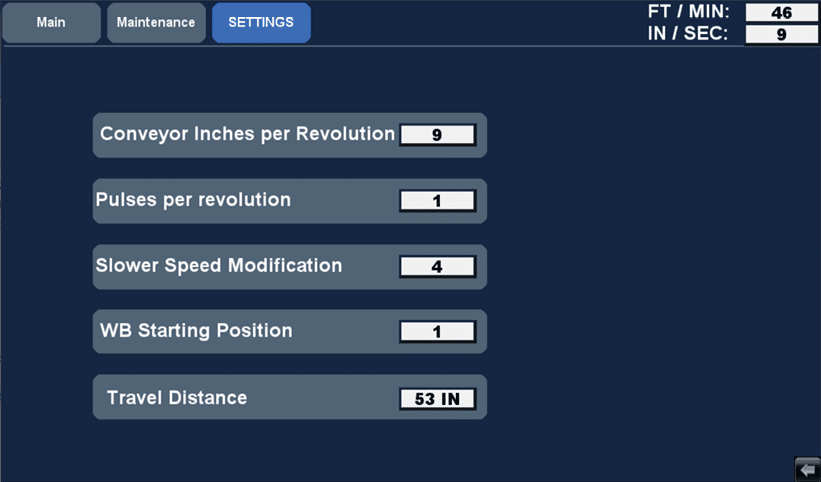
Fig 4.2 – 2 – HMI Settings screen
4.3 Starting Trolley Movement #
Once all of information is correct in your conveyor setup, you’ll begin the process of ensuring the wheelblastIT trolleys movement is correct.
- Using your hand, push both trolleys to the middle of their travel path.
- With one person watching the main screen and one person at the wheelblasIT, place a metal object in front of the driver’s side proximity switch.
- Navigate to the Main screen and confirm the DRIVER SIDE ‘HOME PROX’ button is green. (Fig. 4.3 – 1).
- Repeat for the passenger’s side and confirm the PASS. SIDE ‘HOME PROX’ button is green (Fig. 4.3 – 1). Do not proceed until this is correct.
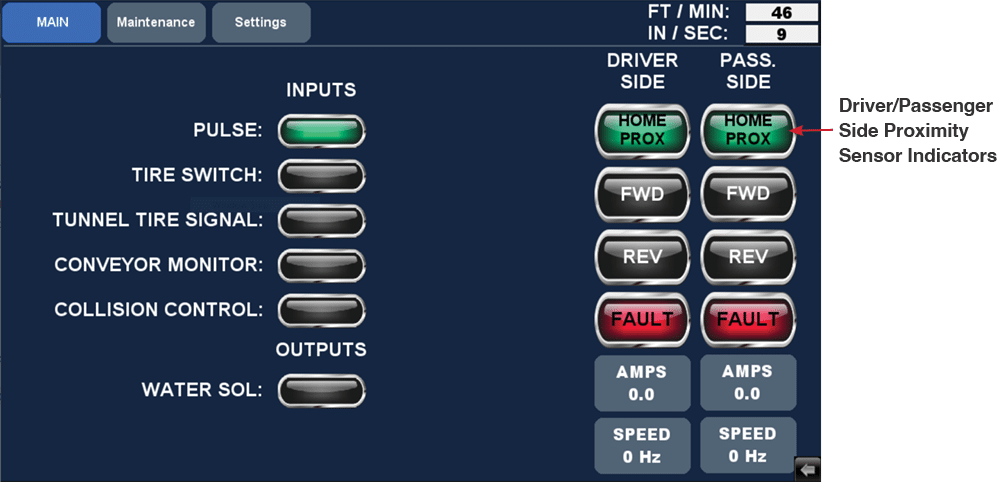
Fig 4.3 – 1 – Main screen proximity sensor indicators
4.4 Verifying Motor Rotation #
Next, verify the rotation of the motors to ensure they are wired correctly.
- Using your hand, push both trolleys to the middle of their travel path.
- Verify 3PH power is on.
- Turn the Main Disconnect switch on the front of the electrical enclosure to the ON position if not already done.
- Turn on disconnects inside the control panel for each motor.
- Verify that the VFDs light up.
- Ensure both trolleys are in the middle of their travel path.
- Navigate to the Maintenance screen.
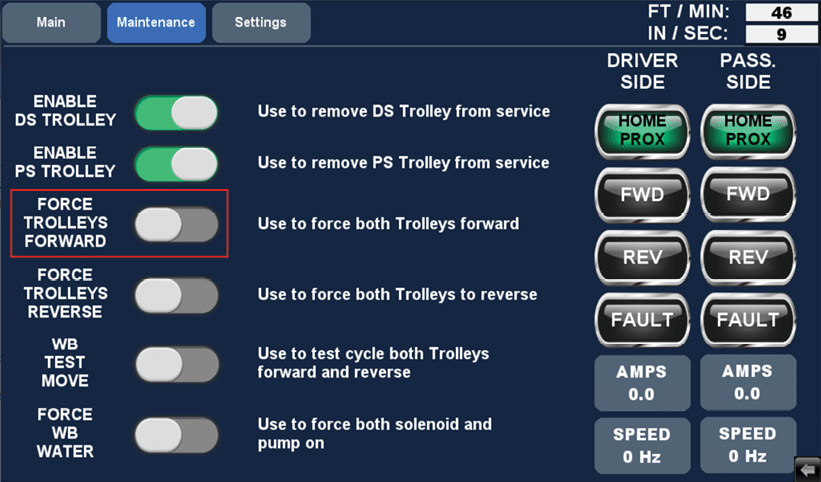
- Press the ‘FORCE TROLLEYS FORWARD’ button momentarily (Fig. 4.4 – 1).
Fig 4.4 – 1 – HMI Maintenance screen
-
- If incorrect, a qualified electrician should switch 2 of the wires going to the motor at the terminal strip to reverse rotation.
- If rotation is incorrect, turn the Main Disconnect switch on the front of the electrical enclosure to the OFF position.
- Turn off 3PH power and wait until the VFD display turns off.
- Have a qualified electrician switch the wires as described in step 7.
- Re-test the system by following steps 1-7.
4.5 Testing the System #
-
Navigate to the Main screen. Below is what is displayed by each input/output indicator (Fig. 4.5 – 1).
-
- Pulse: Pulse was received on the PLC.
-
-
Tire Switch: Signal was received from tire eye or tire pad.
-
Tunnel Tire Signal: Tunnel controller tire signal was received.
-
Conveyor Monitoring: Conveyor is on.
-
Collision Control (optional): Pauses wheelblastIT in its current position.
-
Water Solenoid (optional): Water output solenoid that will turn on when the wheelblastIT begins its movement and turn off when it returns to the home position.
-
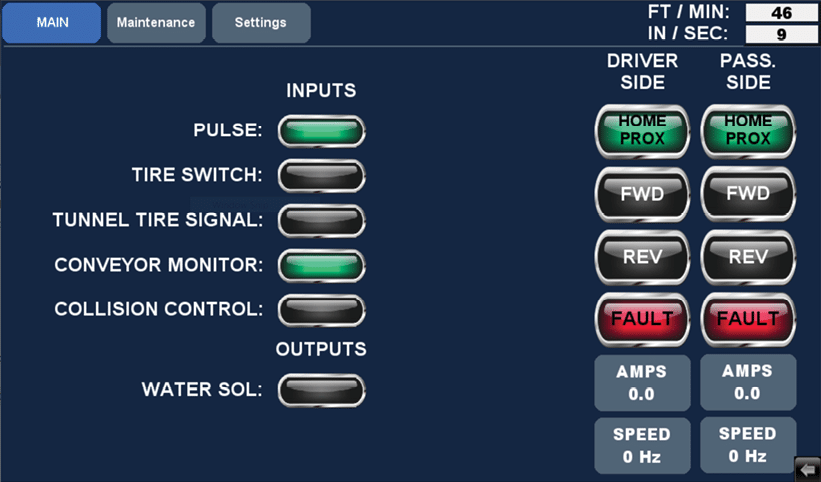
Fig 4.5 – 1 – HMI Main screen indicators
-
Verify that you are getting a tire signal input indicator is green.
-
- If using tire eyes, place a hand in front of the eyes and verify that the ‘TIRE SWITCH’ indicator is green
- If using a tire function, override the function in your tunnel controller and verify that the ‘TUNNEL TIRE SIGNAL’ indicator is green.
-
With the conveyor running, verify that the ‘CONVEYOR MONITOR’ indicator is green.
-
With the conveyor running, verify that the ‘PULSE’ indicator is blinking green every time you get a pulse.
-
If the rotation is correct, the home sensors are functioning, the pulse signal is correct, and conveyor bit lamp is lit, proceed to the next step. If any of the above conditions are not met do not proceed. Return to previous steps to determine the issue.
-
Navigate to the Maintenance screen.
-
With conveyor running press the ‘WB TEST MOVE’ button.
- The trolleys should move to the end of their travel path, stopping roughly ¾” from the rubber bumper, then return to the “Home” position.
- If the trolleys hit the end bumper, navigate to the Settings screen and reduce the travel distance.
- If the trolleys stop farther than ¾” from the end bumper, navigate to the Settings screen and increase the travel distance.
- The trolleys should move to the end of their travel path, stopping roughly ¾” from the rubber bumper, then return to the “Home” position.
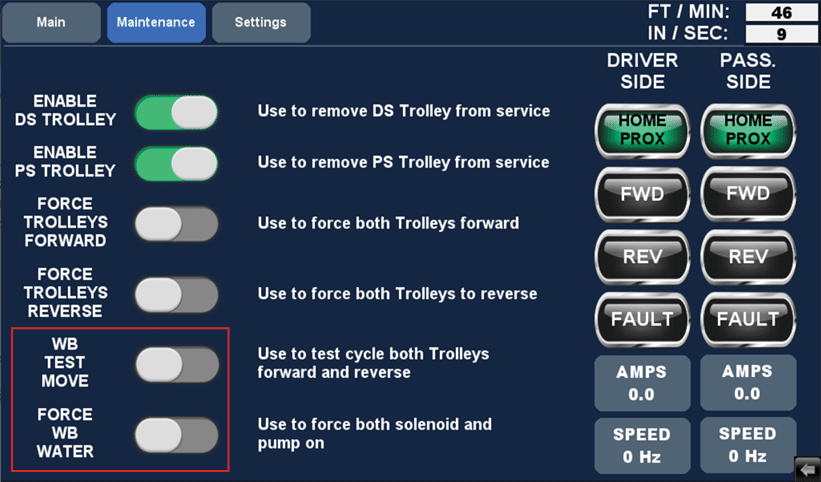
Fig 4.5 – 2 – HMI Maintenance screen and WB TEST MOVE button
- Once you’re satisfied with the motion, press the ‘WB TEST MOVE’ button once more to terminate the test procedure.
- Press the ‘FORCE TROLLEYS REVERSE’ button to return the trolleys to the “Home” position.
- Program and send a car through the wash. Verify that the wheelblastIT starts moving with the wheel. With the ideal start position, the spray pattern should focus on the leading edge of the tire where it meets the rim. At the end position, the spray pattern should be centered on the trailing edge of the tire where it meets the rim.
- If the motion starts late, navigate to the Settings screen and reduce the ‘WB Starting Position’ number.
- If the motion starts early, increase the ‘WB Starting Position’ number.

